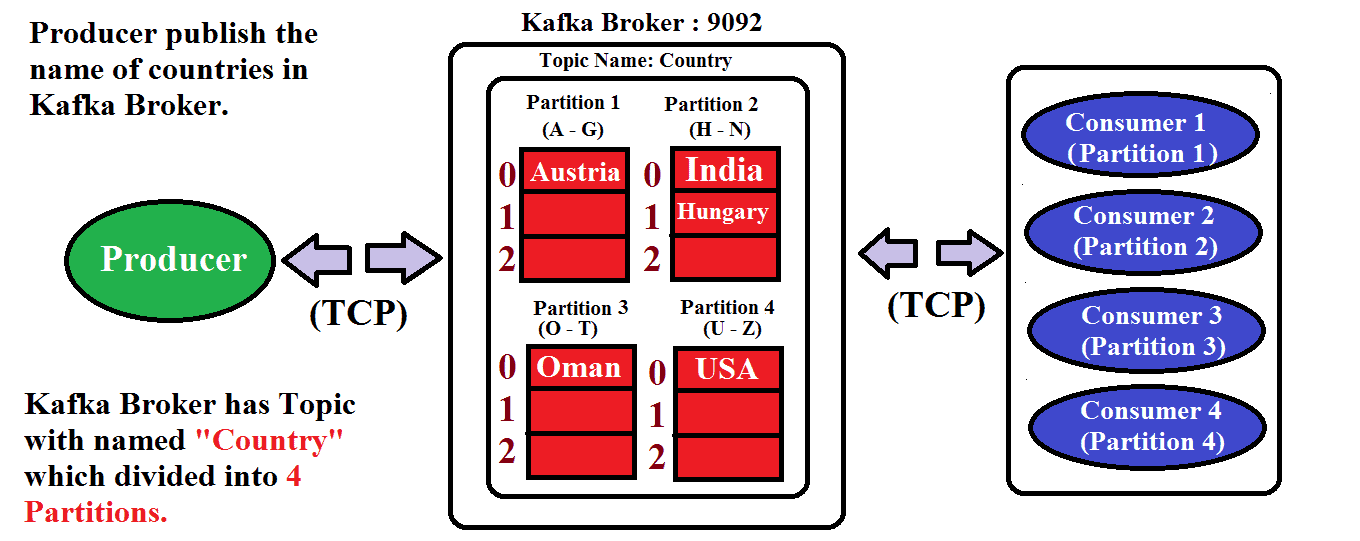
In this article, we will learn how to integrate Apache Kafka in our Spring Boot Application. We will build the Spring Boot Application and implement the Apache Kafka features.

Download and Install the Kafka
The very first thing is we need to download Kafka from here. Once you downloaded the tgz file then extract it.
Note: Please download the Binary file not source file.
Right Click on Kafka file –> 7-zip –> Extract Here
Note: If you are using a window then you might not have a 7-zip installed, So please download it and install it on your system.
Once you extract, you will get a tar file, then extract that file too. After extracting the tar file, you will get the Kafka folder.
Start the Kafka and ZooKeeper Server
Now we need to start the Kafka server as well as ZooKeeper Server. Since ZooKeeper comes along with Kafka, so no need to download it separately.
Steps to Run the ZooKeeper Server
- Go inside the Kafka Folder which you have extracted at the last and rename it as Kafka.
- Open the command prompt under the Kafka folder.
- Enter the following command to start the server.
For Windows
.\bin\windows\zookeeper-server-start.bat .\config\zookeeper.properties
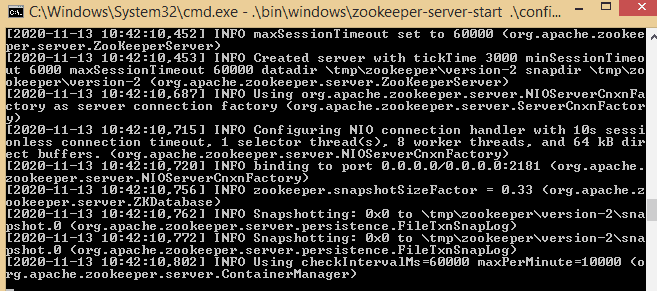
Press Enter, If everything works fine then it will look like as shown in below figure.

For Unix based platform
.\bin\zookeeper-server-start.sh .\config\zookeeper.properties Steps to Run the Kafka Server
Now time to run the kafka Server.
- Again go inside the kafka folder.
- Open the new command prompt terminal.
- Enter the command to start the server.
For windows
.\bin\windows\kafka-server-start.bat .\config\server.propertiesFor Unix based platform
.\bin\kafka-server-start.sh .\config\server.propertiesIf everything is good, then Kafka will start running the same as a zookeeper in your system. Now we are good to go and create our spring boot project.
Note: Source Code is available in bottom section.
Create a Spring Boot Project
Step 1: Create a Project from Spring Initializr.
- Go to the Spring Initializr.
- Enter a Group name, com.pixeltrice.
- Mention the Artifact Id, spring-boot-Kafka-app
- Add the following dependencies,
- Spring Web.
- Spring for Apache Kafka.
Step 2: Click on the Generate button, the project will be downloaded on your local system.
Step 3: Unzip and extract the project.
Step 4: Import the project in your IDE such as Eclipse.
Select File -> Import -> Existing Maven Projects -> Browse -> Select the folder spring-boot-Kafka-app-> Finish.
Step 5: Configure the Producer and Consumer
We can either configure through application.properties or Java Class with @Configuration
Method 1: Using application.properties.
application.properties
spring.kafka.consumer.bootstrap-servers = localhost:9092
spring.kafka.consumer.group-id= group_id
spring.kafka.consumer.auto-offset-reset = earliest
spring.kafka.consumer.key-deserializer= org.apache.kafka.common.serialization.StringDeserializer
spring.kafka.consumer.value-deserializer = org.apache.kafka.common.serialization.StringDeserializer

spring.kafka.producer.bootstrap-servers = localhost:9092
spring.kafka.producer.key-serializer = org.apache.kafka.common.serialization.StringSerializer
spring.kafka.producer.value-serializer = org.apache.kafka.common.serialization.StringSerializer
Explanation
- spring.kafka.consumer.bootstrap-servers: It represents the addresses of the Kafka Brokers which is present in a Kafka cluster. You can use more than one address by separating them with commas(If there is more than one server acting as a broker). It requires so that producers and consumers will connect with the broker server.
Example:
spring.kafka.consumer.bootstrap-servers = localhost:9092,another.host:9092- spring.kafka.consumer.group-id: In Kafka, partitions of the topic have been assigned to the consumer in the group. So that in a group, each partition is consumed by exactly a single consumer. And consumer can join the group using the group id(Give any name as a group id) which we provide in the application.properties file.
Note: If you did not provide any group-id then Kafka will provide some random name.
- spring.kafka.consumer.auto-offset-reset: This property specifies whether the consumers should start reading or consuming the messages from the beginning(earliest) or the last committed offset(saved position, up to where the message has been already consumed, that is latest).
Note: Mainly this information has been stored in the zookeeper. But from the latest version (Kafka 0.9), offset/position information also stored in the Kafka server itself.
Hence, when there is no committed position that means the consumer group is initialized for the very first time, then the message consumption starts from the beginning if we provide the earliest in the application. properties.
- spring.kafka.consumer.key-deserializer: This is used to specify how to deserialize the Key if you noticed in the application.properties file we specify for the producer as well. Since, before publishing the message the publisher is serializing the key using “StringSerializer”.
Hence the consumer should also need to deserialize with the same that is “StringDeserializer”.
- spring.kafka.consumer.value-deserializer: This is used to specify how to deserialize the value. It also works in a similar way as we saw above.
Method 2: Using Java Class with @Configuration
Create a Java Class with any name and tagged with Configuration annotation.
KafkaConfiguration.java
package com.pixeltrice.springbootKafkaapp;

import org.apache.kafka.clients.consumer.ConsumerConfig;
import org.apache.kafka.clients.producer.ProducerConfig;
import org.apache.kafka.common.serialization.StringDeserializer;
import org.apache.kafka.common.serialization.StringSerializer;
import org.springframework.context.annotation.Bean;
import org.springframework.context.annotation.Configuration;
import org.springframework.kafka.config.ConcurrentKafkaListenerContainerFactory;
import org.springframework.kafka.core.ConsumerFactory;
import org.springframework.kafka.core.DefaultKafkaConsumerFactory;
import org.springframework.kafka.core.DefaultKafkaProducerFactory;
import org.springframework.kafka.core.KafkaTemplate;
import org.springframework.kafka.core.ProducerFactory;

import java.util.HashMap;
import java.util.Map;

@Configuration
public class KafkaConfiguration {
    @Bean
    public ProducerFactory<String, String> producerFactoryString() {
        Map<String, Object> configProps = new HashMap<>();

        configProps.put(ProducerConfig.BOOTSTRAP_SERVERS_CONFIG, "localhost:9092");
        configProps.put(ProducerConfig.KEY_SERIALIZER_CLASS_CONFIG, StringSerializer.class);
        configProps.put(ProducerConfig.VALUE_SERIALIZER_CLASS_CONFIG, StringSerializer.class);

        return new DefaultKafkaProducerFactory<>(configProps);
    }

    @Bean
    public KafkaTemplate<String, String> kafkaTemplateString() {
        return new KafkaTemplate<>(producerFactoryString());
    }

    @Bean
    public ConsumerFactory<String, String> consumerFactory() {
        Map<String, Object> configProps = new HashMap<>();
        configProps.put(ConsumerConfig.BOOTSTRAP_SERVERS_CONFIG, "localhost:9092");
        configProps.put(ConsumerConfig.GROUP_ID_CONFIG, "group_id");
        configProps.put(ConsumerConfig.KEY_DESERIALIZER_CLASS_CONFIG, StringDeserializer.class);
        configProps.put(ConsumerConfig.VALUE_DESERIALIZER_CLASS_CONFIG, StringDeserializer.class);

        return new DefaultKafkaConsumerFactory<>(configProps);
    }

    @Bean
    public ConcurrentKafkaListenerContainerFactory<String, String> kafkaListenerContainerFactory() {
        ConcurrentKafkaListenerContainerFactory<String, String> factory = new ConcurrentKafkaListenerContainerFactory<>();
        factory.setConsumerFactory(consumerFactory());

        return factory;
    }
}
If you see in the above Java Class-based configuration, we have done exactly the same as in the application.properties file.
Now the question is which configuration approach will you prefer for real-time projects?? If you ask me then I will prefer the second approach because when we are working on the bigger projects then the properties file might be very huge and it’s going to be very difficult to find something easily.
But when we have Java Class-specific to the 3rd Party library such as Kafka, it’s very easy to find and do modification in the future if required.
Step 6: Create a Service Class for the Producer as well as for the Consumer.
In this step, we will create a service class for the Producers and Consumers to send and receive the messages(events).
ProducerService.java
package com.pixeltrice.springbootKafkaapp;

import org.springframework.kafka.core.KafkaTemplate;
import org.springframework.stereotype.Service;

@Service
public final class ProducerService {

	private final KafkaTemplate<String, String> kafkaTemplate;
	private final String TOPIC = "kafkaTopic";

	public ProducerService(KafkaTemplate<String, String> kafkaTemplate) {
		this.kafkaTemplate = kafkaTemplate;
	}

	public void sendMessage(String message) {
		this.kafkaTemplate.send(TOPIC, message);
	}
}
ConsumerService.java
package com.pixeltrice.springbootKafkaapp;

import org.springframework.kafka.annotation.KafkaListener;
import org.springframework.stereotype.Service;

@Service
public final class ConsumerService {
@KafkaListener(topics = "kafkaTopic", groupId = "group_id")
public void consume(String message) {
		System.out.println("Received Messasge in group - group-id: " + message);
	}
}
Step 7: Create a Controller Class
Here we will create a Controller class to define endpoint which is used to accept the message as a parameter and publish it.
KafkaController.java
package com.pixeltrice.springbootKafkaapp;

import org.springframework.web.bind.annotation.PostMapping;
import org.springframework.web.bind.annotation.RequestMapping;
import org.springframework.web.bind.annotation.RequestParam;
import org.springframework.web.bind.annotation.RestController;

@RestController
@RequestMapping("/kafka")
public final class KafkaController {
    private final ProducerService producerService;

    public KafkaController(ProducerService producerService) {
        this.producerService = producerService;
    }

    @PostMapping(value = "/publish")
    public void sendMessageToKafkaTopic(@RequestParam String message) {
        producerService.sendMessage(message);
    }
}
Step 8: Run the Application
Now it’s time to run the application and publish the message. Once the application starts running, call the endpoint. and send the POST Request from POSTMAN along with some message you want to publish.
http://localhost:8080/kafka/publish?message=I am publishing a message!Note: Before Running the Spring Boot Application make sure the zookeeper and Kafka server both are running. If anyone of them is not running then please run it first as I have already mentioned the steps in the earlier section on how to run the zookeeper and Kafka.
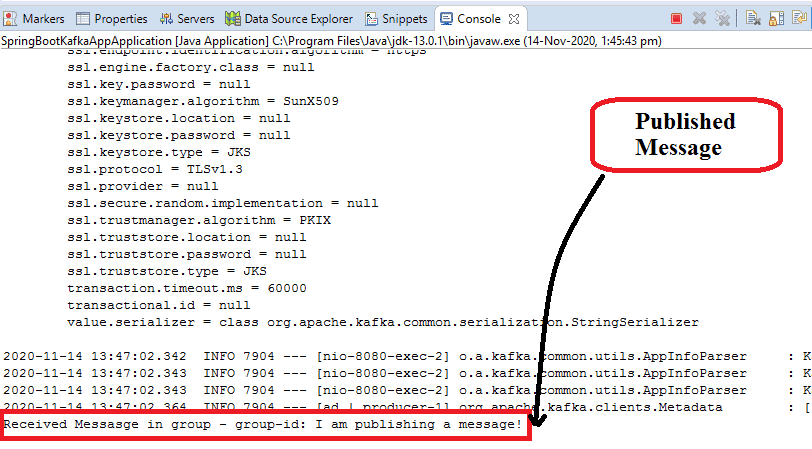
If everything works fine, then the message will publish in your console in the eclipse as shown below figure.

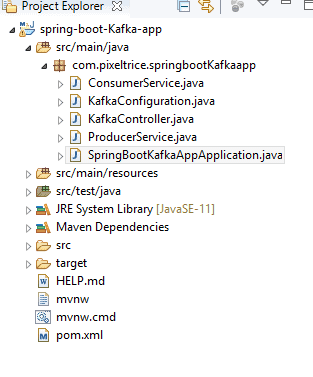
Final Project Structure

Summary
In this article, we have learned how to integrate Apache Kafka in the Spring Boot Application. If you have any doubts or query please feel free to ask me any time in the comment section down below.
You might also like this article.
- Spring Security LDAP Authentication Example using Spring Boot Application
- Payment Integration With Paytm in Spring Boot Application
- Send OTP(One Time Password) Using Spring Boot Application for Authentication
- Make a Voice Call from Spring Boot Application to Mobile Phone
- How to send email using Spring Boot Application
- Spring Boot Security using OAuth2 with JWT