This article covered all the steps required to create a Simple Web Application with Spring Boot. I covered all the points in detail and in very simple words.
Note: This Article is continuous of the previous one where I explain about the Spring Initializr, their uses, and step to import it in a Code Editor like Eclipse.
I recommend you please read that article first. It will be very helpful for you to understand further tutorials. Here is the link.
The following figure shows the structure of all folders after importing the Spring Initializr maven project inside the Eclipse.
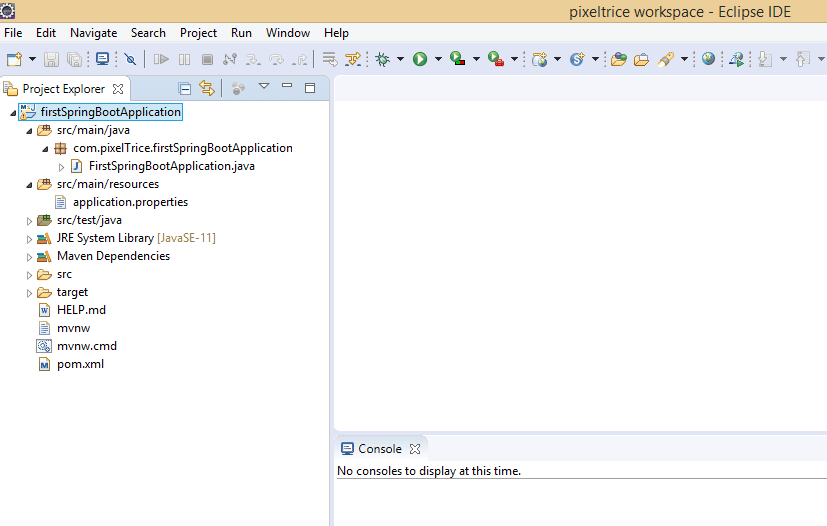
Important files and folders
- Java Resources
- pom.xml
Java Resources
These folders contain two important subfolders that are used to write the java codes and it also contains one properties file.
There are two files inside the Java Resources folder.
- src/main/java: In this folder, we create packages and under that dot(.) java files.
- src/main/resources: It contains the application.properties file. It is used to write all the common properties such as the HTTP port number on which spring boot application will run, even you can store constant data that is not going to change in the future.
application.properties file
The properties which you store in this file will automatically come in the classpath during execution, JVM will look into properties files and perform necessary things based on the properties you have written inside that.
Properties are nothing but we write in the form of key-value pairs. Example: server. port = 8080, Here the left side we have “server.port” which is key and on the right-hand side, we have 8080. So once you run the Spring Boot application then you can see your application running on port number 8080 in any browser.
The URL of your application will be: localhost:8080
pom.xml
It is one of the most important files for any Spring boot application. It contains all the necessary information about your project or application. Look below the sample pom.xml file.
<?xml version="1.0" encoding="UTF-8"?>
<project xmlns="http://maven.apache.org/POM/4.0.0" xmlns:xsi="http://www.w3.org/2001/XMLSchema-instance"
	xsi:schemaLocation="http://maven.apache.org/POM/4.0.0 https://maven.apache.org/xsd/maven-4.0.0.xsd">
	<modelVersion>4.0.0</modelVersion>
	<parent>
		<groupId>org.springframework.boot</groupId>
		<artifactId>spring-boot-starter-parent</artifactId>
		<version>2.3.2.RELEASE</version>
		<relativePath/> <!-- lookup parent from repository -->
	</parent>
	<groupId>com.example</groupId>
	<artifactId>demo</artifactId>
	<version>0.0.1-SNAPSHOT</version>
	<packaging>war</packaging>
	<name>demo</name>
	<description>Demo project for Spring Boot</description>

	<properties>
		<java.version>11</java.version>
	</properties>

	<dependencies>
		<dependency>
			<groupId>org.springframework.boot</groupId>
			<artifactId>spring-boot-starter-web</artifactId>
		</dependency>

		<dependency>
			<groupId>org.springframework.boot</groupId>
			<artifactId>spring-boot-starter-tomcat</artifactId>
			<scope>provided</scope>
		</dependency>
		<dependency>
			<groupId>org.springframework.boot</groupId>
			<artifactId>spring-boot-starter-test</artifactId>
			<scope>test</scope>
			<exclusions>
				<exclusion>
					<groupId>org.junit.vintage</groupId>
					<artifactId>junit-vintage-engine</artifactId>
				</exclusion>
			</exclusions>
		</dependency>
	</dependencies>

	<build>
		<plugins>
			<plugin>
				<groupId>org.springframework.boot</groupId>
				<artifactId>spring-boot-maven-plugin</artifactId>
			</plugin>
		</plugins>
	</build>

</project>
Information present in pom.xml file
- Project meta data
- dependencies
- plugins
Project meta data
It is a top section of the pom.xml file, it contains your application name, the version number of application, your organization name, and the output file type of application it can be in jar or war file.
Sample view of Project meta data in pom.xml
        <groupId>com.pixeltrice</groupId>
	<artifactId>firstSpringBootApplication</artifactId>
	<version>0.0.1-SNAPSHOT</version>
	<packaging>jar</packaging>
	<name>firstSpringBootApplication</name>
	<description>Demo project for Spring Boot</description>
Some tags used in above such as groupId , artifactId etc.
<groupId>com.pixeltrice</groupId>In groupId we mentioned the company name or organization name as shown above.
<artifactId>firstSpringBootApplication</artifactId>ArtifactId tage used to mention the name of our project.
<version>0.0.1-SNAPSHOT</version>It represents the version number of specific release like 1.0, 1.5 etc.
<name>firstSpringBootApplication</name>name tag contains the project name.
dependencies
<dependencies>
		<dependency>
			<groupId>org.springframework.boot</groupId>
			<artifactId>spring-boot-starter-web</artifactId>
		</dependency>

		<dependency>
			<groupId>org.springframework.boot</groupId>
			<artifactId>spring-boot-starter-tomcat</artifactId>
			<scope>provided</scope>
		</dependency>
		<dependency>
			<groupId>org.springframework.boot</groupId>
			<artifactId>spring-boot-starter-test</artifactId>
			<scope>test</scope>
			<exclusions>
				<exclusion>
					<groupId>org.junit.vintage</groupId>
					<artifactId>junit-vintage-engine</artifactId>
				</exclusion>
			</exclusions>
		</dependency>
	</dependencies>
The Dependencies portion contains the detail of all necessary jar files required for the application. For example, if your application requirement is to connect with the MySQL database.
Then the convention method is to download the MySQL connector jar file and add in classpath but with the use of pom.xml file, you don’t have to do all these things by yourself. You simply mention the detail of that MySQL driver or connector as shown below.
<dependency>
    <groupId>mysql</groupId>
    <artifactId>mysql-connector-java</artifactId>
    <version>8.0.21</version>
</dependency>
It will automatically be downloaded and placed on the necessary path inside your eclipse.
I hope you got a basic idea about the maven with spring boot. Now let’s begin to work on the project.
Step 2: Creating a Web Application Spring Boot Project.
Note: If you did not read Step 1, please follow this link for Step 1.
Create a controller class for your application in the following path src/main/java/com/pixelTrice/firstSpringBootApplication/HelloWorldController.java)
or you might see inside the eclipse like src.main.java, under that com.pixelTrice.firstSpringBootApplication, so inside this only you need to create a class with name HelloWorldController.java.
Note: You can give any name to your java class. But we have to make this class as controller class, don’t worry I will explain below how to make any simple class as a controller class and also will explain to you What is Controller class.
Please look below code how to make any class as Controller class in java.
package com.pixelTrice.firstSpringBootApplication;
import org.springframework.web.bind.annotation.RestController;
import org.springframework.web.bind.annotation.RequestMapping;

@RestController
public class HelloWorldController {

	@RequestMapping("/home")
	public String index() {
		return "Greetings from Spring Boot!";
	}

}
Any class which tagged with @RestController in Spring Boot is called Controller class.
Example
@RestController
public class HelloWorldController
Note: You have to add a dependency for the spring web at starting only when you were creating a basic structure in Spring Initializr. Other @RequestMapping and @ResquestorController annotation will give an error.
Purpose of Controller Class in Spring Boot.
It provides the path to the end-user. It will be more clear if I explain to you another annotation used in the above code that is @RequestMapping(“/home”).
@RequestMapping is the specific annotation of Spring boot which is a combination of two different annotations that is @Controller and @ResponseBody. These two are from a simple Spring framework.
@RequestMapping is tagged to a particular method inside a controller class. It used to execute the method when some particular path has requested by the user. And that can be identified with help of attribute which used with @RequestMapping annotation that is (“/home”).
Example
If you search the following URL “localhost:8080/home” from the browser after running the spring boot application. As mentioned path that is “/home”. So in your Spring boot application, the method which is tagged with “/home” will get executed. For our case as shown below.
@RequestMapping("/home")
	public String index() {
		return "Greetings from Spring Boot!";
	}
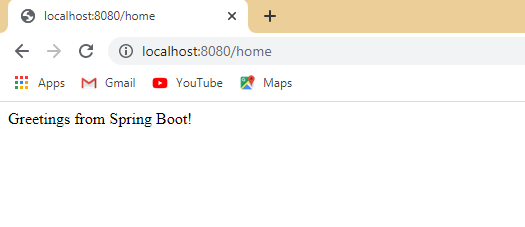
Hence on your browser screen it will display “Greetings from Spring Boot!”.
Next step is to Create an Application class
Spring Initializr already created this class for you, it might be present on the following path src/main/java/com/pixelTrice/firstSpringBootApplication/FirstSpringBootApplication.java It might look as below.
package com.pixelTrice.firstSpringBootApplication;

import org.springframework.boot.SpringApplication;
import org.springframework.boot.autoconfigure.SpringBootApplication;

@SpringBootApplication
public class FirstSpringBootApplication {

	public static void main(String[] args) {
		SpringApplication.run(FirstSpringBootApplication.class, args);
	}

}
This name of class might be different for you but the class which tagged with annotation @SpringBootApplication and having a main() are considered to be driving class for your entire application.
@SpringBootApplication
This annotation is the combination of three different annotations such as @Configuration, @EnableAutoConfiguration, @ComponentScan.
@SpringBootApplication = @Configuration + @EnableAutoConfiguration + @ComponentScan.
@Configuration: For the Class which tagged with @Configuration annotation, it indicates to the Spring to create the bean or object for this class in application context or in spring container.
Note: Object is called Bean in Spring.
@EnableAutoConfiguration: This annotation tells Spring Boot to create or add the beans based on the jar files or other properties on the classpath.
Example :
Suppose if are not using @EnableAutoConfiguration annotation and suppose we have a jar file for embedded tomcat that is tomcat-embedded.jar on classpath then to configure or to tell the spring to create a bean for this jar file we need to create another object manually that is of TomcatEmbeddedServletContainerFactory type.
But if we are using @EnableAutoConfiguration then you don’t have to worry about this Spring will automatically create the bean.
@ComponentScan: This annotation basically used to tell spring to find out all the classes, services, and configurations which is present in that base package and register it with application context before running the spring boot application. So that bean of that class will be created on the spring container.
main() method: Inside this method we are calling the run() method which is only responsible to launch the Spring Boot Application.
SpringApplication.run(FirstSpringBootApplication.class, args);The above line of code is very important to understand because this is only responsible for doing everything such as from creating beans to launching your entire application.
SpringApplication.run(FirstSpringBootApplication.class, args) this run method creates a Spring container and all necessary objects or beans under that based on the files which are on the classpath.
Basically run() combined or assembled or bootstrap all the necessary resources in a single unit, even tomcat server is also embedded with that. This capability of spring boot makes our application a completely standalone application.
Run the Spring boot Application
- Using Eclipse Editor
Go to Application.java files –> Right click —> Run As —-> Java Application
Note: Once you run the application, you check on your browser by entering the URL localhost:8080. You will get Screen as shown below.
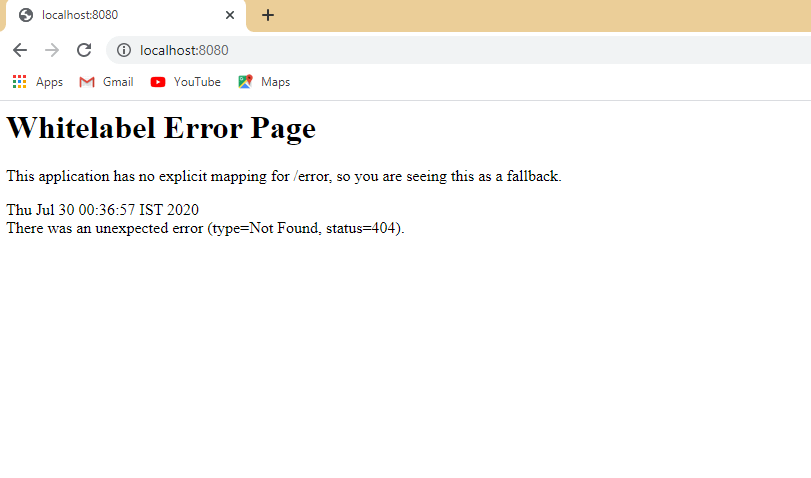
Now if you go to localhost:8080/home you will able to see those lines which is written inside the index() in HelloWorldController.java.
There is also run your Spring Boot application through the command line.
2. Run the application using Command Line
Step 1: Create the jar file of the Spring Boot Application
In order to create a jar file , there must be packaging tag inside the pom.xml file
<packaging>jar</packaging>You can see below the pom.xml to add the <packaging> tag .
 <groupId>com.pixeltrice</groupId>
	<artifactId>firstSpringBootApplication</artifactId>
	<version>0.0.1-SNAPSHOT</version>
	<packaging>jar</packaging>
	<name>firstSpringBootApplication</name>
	<description>Demo project for Spring Boot</description>
The next step is to go inside the folder where the project is located. On my system, it is located on following path C:\Users\1302143\Desktop\firstSpringBootApplication
Open the command prompt inside that folder, make sure you should on the following path in your command prompt as shown in the below figure.

Type command mvn clean install as shown below.

Press enter. You will see the following messages inside the command prompt.
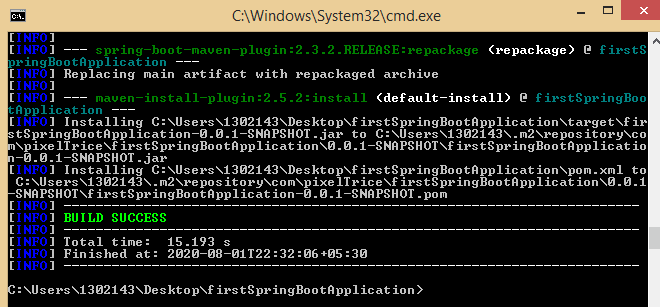
Once you got the above message it means jar file of your project is created. In order to find the location of jar file you have to go to the following path where your project is located C:\Users\1302143\Desktop\firstSpringBootApplication you will see target folder, inside that you will get .jar file with name firstSpringBootApplication-0.0.1-SNAPSHOT.jar
Step 2: Run the firstSpringBootApplication-0.0.1-SNAPSHOT.jar file
In order to run this file, you again have to open the command prompt inside the path where your jar file is located C:\Users\1302143\Desktop\firstSpringBootApplication\target, as shown below,

Write the command java -jar firstSpringBootApplication-0.0.1-SNAPSHOT.jar

Press Enter. You will see as shown below.
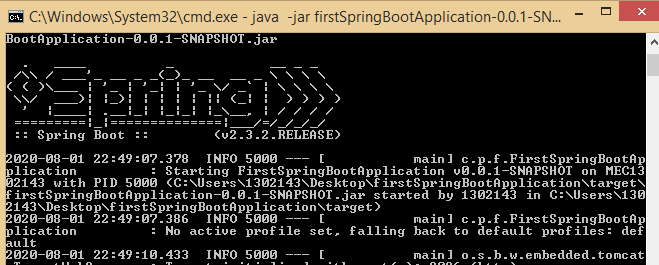
BOOM! Your application is now running. In order to check go to the path localhost:8080/home on your browser.

Summary
Bravo! If follow all along then you finally Create a Simple Web Application with Spring Boot. I know this is very simple, but believe me, if you understand the basic concept about how to build an application from scratch then you will be able to easily build up big applications.
Thank You So much for reading my article. If want to learn some topic related to basic java, please do check out my other articles from here. I explained everything in detail along with Real World examples and application-based examples.