In this article, we will learn to build Spring Boot Restful CRUD API with Hibernate and Postgresql Database. Here we will build a spring boot application named Employee Management System from scratch and at the same time, I will explain each line of code which going to use in building the application.
Note: Video Tutorial for this article is available below.
Features we need to implement in Employee Management System Application
- Fetch a list of Employees and give it in response using Hibernate.
- Create new employees along with their details.
- Read or fetch the employee detail through JPA Hibernate and display it in response.
- Update the Existing employee details.
- Delete the Employee details from the database through JPA Hibernate.
Note: Since we are using a Postgresql as a database to build an application. You must have Postgresql installed on your system.
Steps to setup the PostgreSQL Database in your system.
Please follow the below link to download and install the Postgresql database on your local system.
Once the download and installation completed please follow the steps mentioned below.
Steps to configure the Postgresql database and create the Employee table.
Step 1: Please search on PgAdmin on your local system and open it.
Step 2: Enter the login password as you have given during installing it. PgAdmin will look like as shown below.
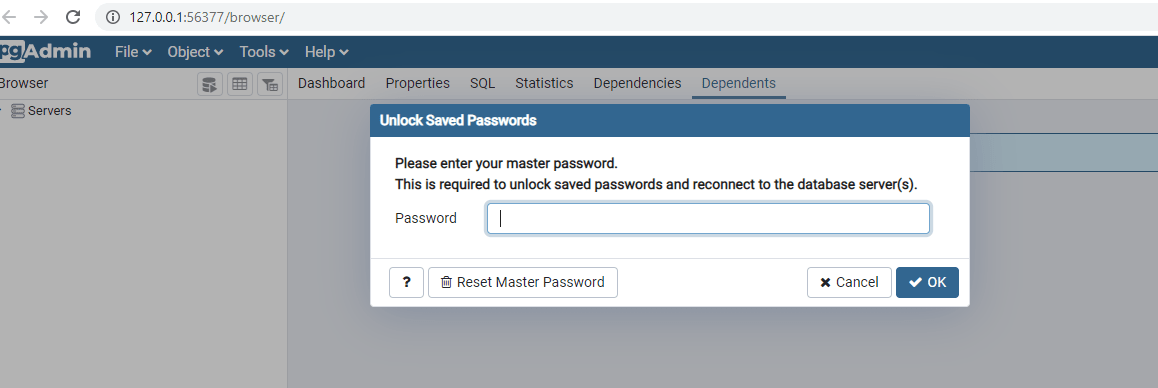
Note: PgAdmin is a management tool specially designed to run the Postgresql database.
Step 3: By default, there will be one server named PostgreSQL in the top left corner of the screen. Once you click, you will see the default database named Postgres.
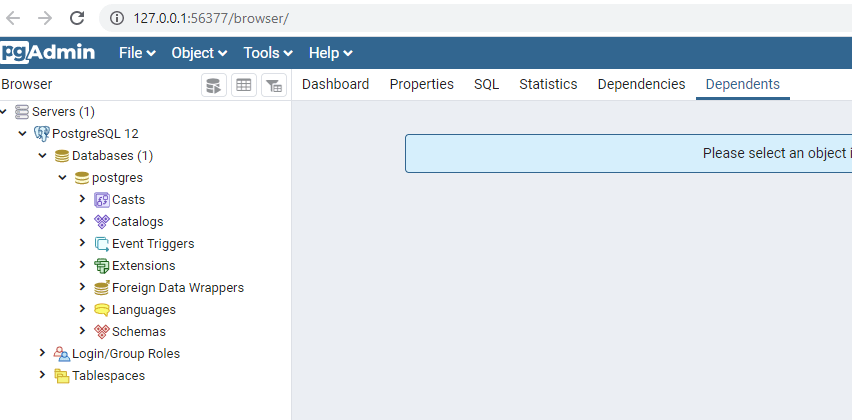
Step 4: Click on postgres and proceed as mentioned below.
postgres –> Schemas –> public –> Tables–> Right Click –> Create
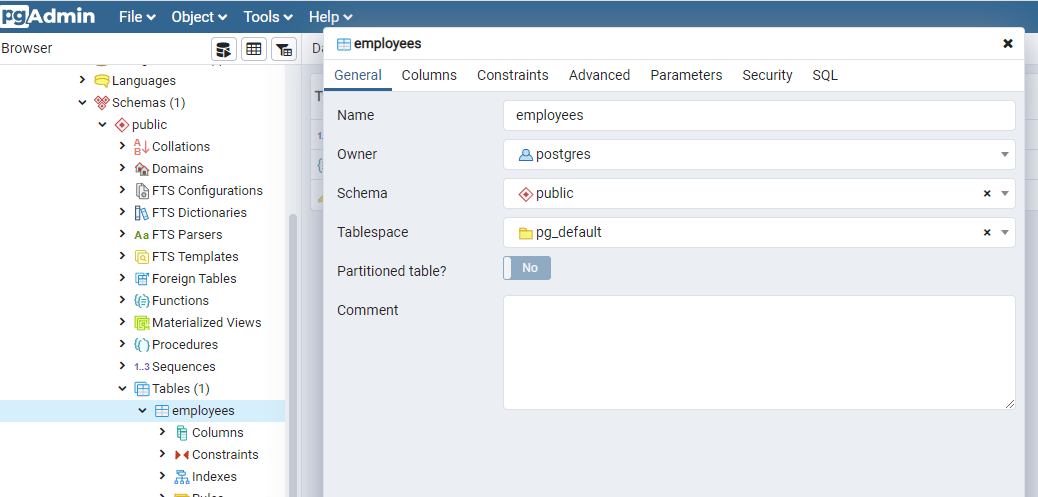
Step 5: Once you click on the create button you will get the screen like as below. Enter the table name employees.
Step 6: Switch to column tab and create a column as shown in below figure.
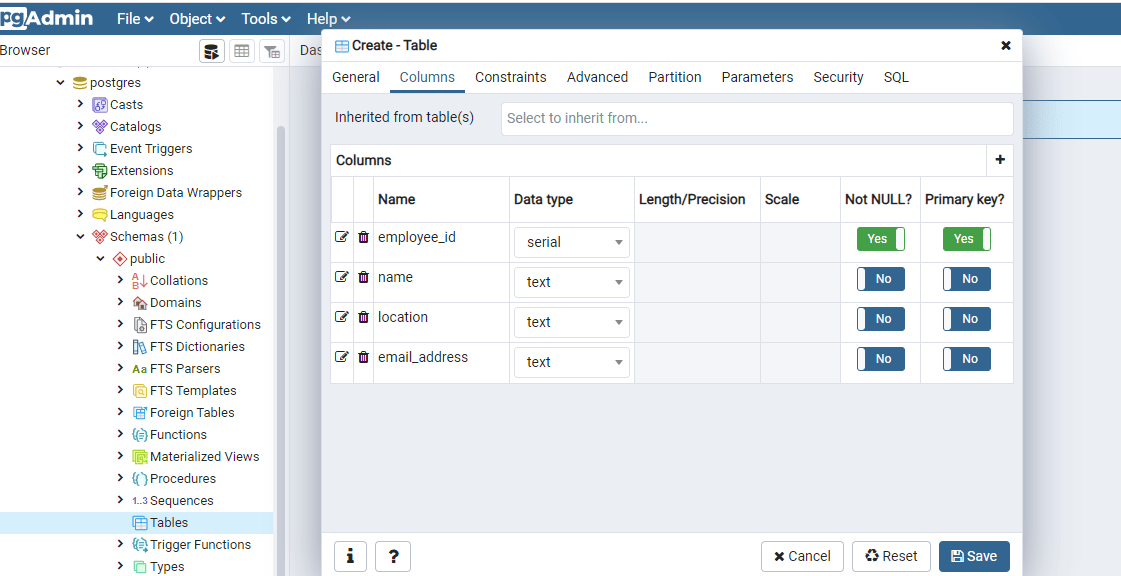
Step 7: Press on the save button. Once you saved the table will be created inside the Tables section.
Now we good to go further and work on Spring Boot part.
Steps to follow in order to build the Employee Management System using Spring Boot
Step 1: Create a Spring Boot Maven project from Spring Initializr.
Step 2: Give the Group name, it should be your company or college name or anything which belongs to you. For me com.pixeltrice.
Step 3: Enter the project name in the artifact Id field. spring-boot-Restful-API-hibernate-postgresql
Step 4: Add following dependencies.
- Spring Web
- Spring Data JPA
- Postgresql Driver
Step 5: Keep default value for other fields such as Packaging, Java version number. Once everything is done, click on the generate button.
Step 6: Once you clicked, it will download the Spring Boot maven project in the form of a zip file.
Step 7: Unzip and import it in IDE such as Eclipse.
Select File -> Import -> Existing Maven Projects -> Browse -> Select the folder spring-boot-Restful-CRUD-API-with-hibernate-and-postgresql-> Finish.
Step 8: Configure PostgreSQL as datasource in application.properties file.
spring.datasource.url=jdbc:postgresql://localhost:5432/postgres
spring.datasource.username=postgres
spring.datasource.password=root
spring.jpa.show-sql=true

spring.jpa.properties.hibernate.dialect = org.hibernate.dialect.PostgreSQLDialect
spring.jpa.hibernate.ddl-auto = update
Explanation of each property in above file.
- spring.datasource.url : It represents the exact location of your database. It contains three things SQL driver name, database server URL, and database name. So in our case.
- sql driver name: jdbc:postgresql
- database server URL: localhost:5432
- database name: postgres
So, in short, we are giving the instruction to spring boot to connect with the PostgreSQL database whose name is postgres.
2. spring.datasource.username: Here you have to mention the username to access the database.
3. spring.datasource.password: Mention the password for database.
4. spring.jpa.show-sql=true: This will show all the queries which Hibernate executed or run in the log output.
5. spring.jpa.properties.hibernate.dialect: It helps hibernate to generate the SQL properly for the mentioned database.
6. spring.jpa.hibernate.ddl-auto = update. It means whenever you start the server Hibernate can only able to update at that point in time. We can also assign value to create. It means every time it will create the table when the server start, we really not recommended for production-based application.
Step 9: Create an Employee Entity Class which directly mapped with the Postgresql Database table.
package com.pixeltrice.springbootRestfulAPIhibernatepostgresql;

import javax.persistence.Column;
import javax.persistence.Entity;
import javax.persistence.GeneratedValue;
import javax.persistence.GenerationType;
import javax.persistence.Id;
import javax.persistence.Table;

@Entity
@Table(name = "employees")
public class EmployeeEntity {

	    @Id
	    @GeneratedValue(strategy = GenerationType.IDENTITY)
	    private Integer employeeId;

	    @Column(name = "name", nullable = false)
	    private String name;

	    @Column(name = "location", nullable = false)
	    private String location;

	    @Column(name = "email_address", nullable = false)
	    private String emailId;

	    public EmployeeEntity() {

	    }

	    public EmployeeEntity(String name, String location, String emailId) {
	         this.name = name;
	         this.location = location;
	         this.emailId = emailId;
	    }


	        public Integer getEmployeeId() {
	        return employeeId;
	    }
	    public void setId(Integer employeeId) {
	        this.employeeId = employeeId;
	    }

	   	    public String getName() {
	        return name;
	    }
	    public void setName(String name) {
	        this.name = name;
	    }


	    public String getLocation() {
	        return location;
	    }
	    public void setLocation(String location) {
	        this.location = location;
	    }


	    public String getEmailId() {
	        return emailId;
	    }
	    public void setEmailId(String emailId) {
	        this.emailId = emailId;
	    }

	    @Override
	    public String toString() {
	        return "Employee [employeeId=" + employeeId + ", name=" + name + ", emailId=" + emailId
	       + "]";
	    }

	}
Explanation of Annotation used in the above code.
@Entity: It represents the Entity class in Spring Boot. If any class tagged with Entity annotation then it representing or mapped with some table present in the database.
@Table: It indicates which table of the database is mapped with Entity class, in our case employee table is mapped with EmployeeEntity class.
@Id: This annotation tagged with that variable or parameter which used to represent the primary key column in the database table, in our case employeeId representing the primary key.
@Column: The parameter or variable tagged with Column annotation to represent the table column.
Step 10: Create a interface which extend the JPA Repository class.
package com.pixeltrice.springbootRestfulAPIhibernatepostgresql;

import org.springframework.data.jpa.repository.JpaRepository;
import org.springframework.stereotype.Repository;

    @Repository
   public interface EmployeeRepository extends JpaRepository<EmployeeEntity, Integer>{

	}
In the above code, you can see we have extended a predefined class JpaRepository. This class contains all the methods to perform the CRUD operation, we don’t have to write our own method, This really makes our work easy. Don’t worry I will explain in detail.
JpaRepository<EmployeeEntity, Integer>: In the angular bracket <> we have to mention the entity class name and the data type of the primary key. Since in our case, the Entity class name is EmployeeEntity and the primary key is employeeId having of Integer type.
@Repository: This annotation indicates that the class or interface is completely dedicated to performing all sorts of CRUD Operations such as Create, update, read, or delete the data from the database.
Step 11: Create a Employee Controller class.
package com.pixeltrice.springbootRestfulAPIhibernatepostgresql;

import java.util.HashMap;
import java.util.List;
import java.util.Map;

import org.springframework.beans.factory.annotation.Autowired;
import org.springframework.http.ResponseEntity;
import org.springframework.validation.annotation.Validated;
import org.springframework.web.bind.annotation.DeleteMapping;
import org.springframework.web.bind.annotation.GetMapping;
import org.springframework.web.bind.annotation.PathVariable;
import org.springframework.web.bind.annotation.PostMapping;
import org.springframework.web.bind.annotation.PutMapping;
import org.springframework.web.bind.annotation.RequestBody;
import org.springframework.web.bind.annotation.RequestMapping;
import org.springframework.web.bind.annotation.RestController;

@RestController
@RequestMapping("/api/employee")
public class EmployeeController {

	@Autowired
	EmployeeRepository employeeRepository;

	@GetMapping("/get-all-employees")
	public List<EmployeeEntity> getAllEmployee(){
		List<EmployeeEntity> allEmployeelist = employeeRepository.findAll();
		return allEmployeelist;

	}

	@GetMapping("/get-employee/{id}")
	public EmployeeEntity getEmployeebyId(@PathVariable(value = "id") Integer employeeId)

	{
		EmployeeEntity employeeEntity = employeeRepository.findById(employeeId).get();

		return employeeEntity;
	}

    @PostMapping("/create-employees")
    public EmployeeEntity createEmployee(@RequestBody EmployeeEntity employee) {

    	 EmployeeEntity savedEmployee = employeeRepository.save(employee);

    	 return savedEmployee;
    }

    @PutMapping("/update-employees/{id}")
    public ResponseEntity<EmployeeEntity> updateEmployee(@PathVariable(value = "id") Integer employeeId,
         @RequestBody EmployeeEntity employeeDetails) {
        EmployeeEntity employee = employeeRepository.findById(employeeId).get();

        employee.setEmailId(employeeDetails.getEmailId());
        employee.setName(employeeDetails.getName());
        employee.setLocation(employeeDetails.getLocation());
        final EmployeeEntity updatedEmployee = employeeRepository.save(employee);
        return ResponseEntity.ok(updatedEmployee);
    }

    @DeleteMapping("/delete-employees/{id}")
    public Map<String, Boolean> deleteEmployee(@PathVariable(value = "id") Integer employeeId)
    {
     EmployeeEntity employee = employeeRepository.findById(employeeId).get();

        employeeRepository.delete(employee);
        Map<String, Boolean> response = new HashMap<>();
        response.put("deleted", Boolean.TRUE);
        return response;
    }
}
Explanation of EmployeeController.java class as shown above.
- Injected or Autowired or created the Repository Object in the controller class.
@Autowired
EmployeeRepository employeeRepository;
2. Api to get the list of employees present in database table
@GetMapping("/get-all-employees")
	public List<EmployeeEntity> getAllEmployee(){
		List<EmployeeEntity> allEmployeelist = employeeRepository.findAll();
		return allEmployeelist;
In the above method, we are calling one predefined method findAll() to get the list of employees present in the table. findAll() method is already defined in JpaRepositorty class which return the list of Object. In our case the object is Employee, so it will return the list of Employee present in the table.
3. Api which return the single employee or object based on Id.
@GetMapping("/get-employee/{id}")
	public EmployeeEntity getEmployeebyId(@PathVariable(value = "id") Integer employeeId)

	{
		EmployeeEntity employeeEntity = employeeRepository.findById(employeeId).get();

		return employeeEntity;
	}
This API will return the single employee details based on the EmployeeId. findById() is also predefined in JpaRepository class.
@PathVariable: It is used to take the value from URL and assigned or mapped to the class variable or parameter. In our case, we are taking id from /get-employee/{id} and assigned to the employeeId.
4. Create a new Employee in database table.
@PostMapping("/create-employees")
    public EmployeeEntity createEmployee(@RequestBody EmployeeEntity employee) {

    	 EmployeeEntity savedEmployee = employeeRepository.save(employee);

    	 return savedEmployee;
    }
This API has a method save() which is used to create or update the employee detail inside the database table. Since we are using @PostMapping annotation so it will act as creating the object in the table.
5. Update the existing employee detail in database.
 @PutMapping("/update-employees/{id}")
    public ResponseEntity<EmployeeEntity> updateEmployee(@PathVariable(value = "id") Integer employeeId,
          @RequestBody EmployeeEntity employeeDetails) {
        EmployeeEntity employee = employeeRepository.findById(employeeId).get();

        employee.setEmailId(employeeDetails.getEmailId());
        employee.setName(employeeDetails.getName());
        employee.setLocation(employeeDetails.getLocation());
        final EmployeeEntity updatedEmployee = employeeRepository.save(employee);
        return ResponseEntity.ok(updatedEmployee);
    }
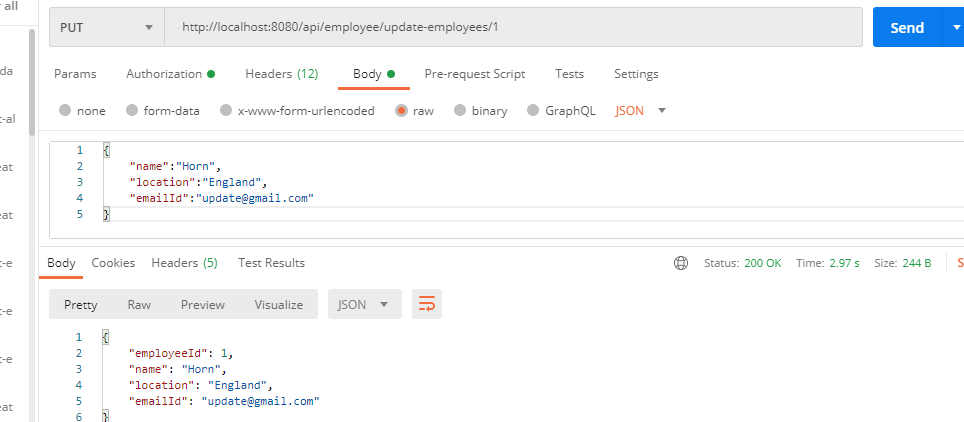
It will update the existing employee detail. Since we are using @PutMapping annotation which used for updating purposes, so in this case save() method is used for updating it.
6. Delete the existing employee from the database table.
 @DeleteMapping("/delete-employees/{id}")
    public Map<String, Boolean> deleteEmployee(@PathVariable(value = "id") Integer employeeId)
    {
     EmployeeEntity employee = employeeRepository.findById(employeeId).get();

        employeeRepository.delete(employee);
        Map<String, Boolean> response = new HashMap<>();
        response.put("deleted", Boolean.TRUE);
        return response;
    }
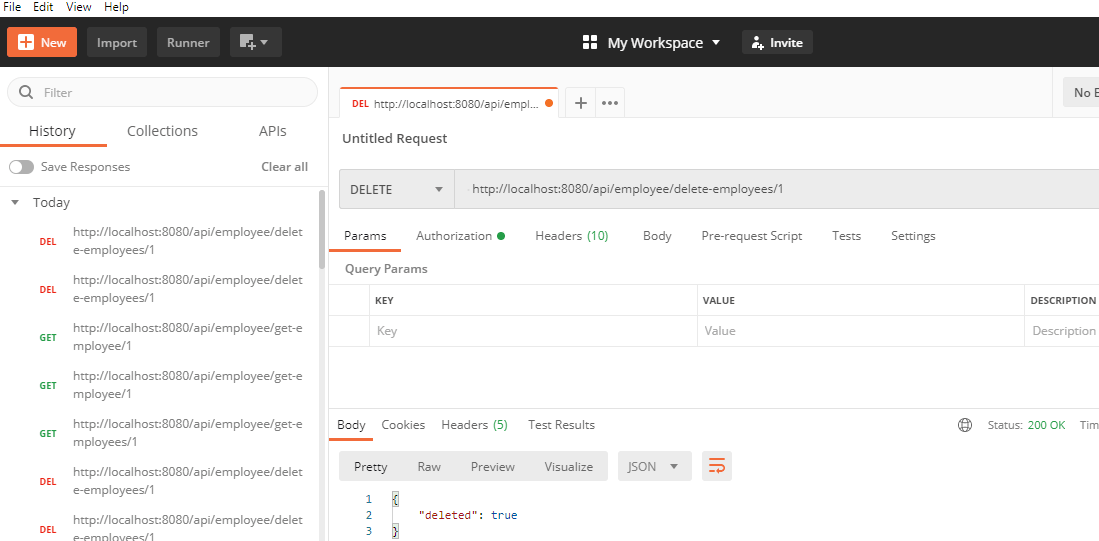
This api is used for deleting the existing employee based on employee Id.
Step 12: Make sure pom.xml file should have following dependencies.
<?xml version="1.0" encoding="UTF-8"?>
<project xmlns="http://maven.apache.org/POM/4.0.0" xmlns:xsi="http://www.w3.org/2001/XMLSchema-instance"
	xsi:schemaLocation="http://maven.apache.org/POM/4.0.0 https://maven.apache.org/xsd/maven-4.0.0.xsd">
	<modelVersion>4.0.0</modelVersion>
	<parent>
		<groupId>org.springframework.boot</groupId>
		<artifactId>spring-boot-starter-parent</artifactId>
		<version>2.3.2.RELEASE</version>
		<relativePath/> <!-- lookup parent from repository -->
	</parent>
	<groupId>com.pixeltrice</groupId>
	<artifactId>spring-boot-Restful-API-hibernate-postgresql</artifactId>
	<version>0.0.1-SNAPSHOT</version>
	<name>spring-boot-Restful-API-hibernate-postgresql</name>
	<description>Demo project for Spring Boot</description>

	<properties>
		<java.version>11</java.version>
	</properties>

	<dependencies>
		<dependency>
			<groupId>org.springframework.boot</groupId>
			<artifactId>spring-boot-starter-data-jpa</artifactId>
		</dependency>
		<dependency>
			<groupId>org.springframework.boot</groupId>
			<artifactId>spring-boot-starter-web</artifactId>
		</dependency>

		<dependency>
			<groupId>org.postgresql</groupId>
			<artifactId>postgresql</artifactId>
			<scope>runtime</scope>
		</dependency>
		<dependency>
			<groupId>org.springframework.boot</groupId>
			<artifactId>spring-boot-starter-test</artifactId>
			<scope>test</scope>
			<exclusions>
				<exclusion>
					<groupId>org.junit.vintage</groupId>
					<artifactId>junit-vintage-engine</artifactId>
				</exclusion>
			</exclusions>
		</dependency>
	</dependencies>

	<build>
		<plugins>
			<plugin>
				<groupId>org.springframework.boot</groupId>
				<artifactId>spring-boot-maven-plugin</artifactId>
			</plugin>
		</plugins>
	</build>

</project>
Step 13: Our main class should look like as shown below.
package com.pixeltrice.springbootRestfulAPIhibernatepostgresql;

import org.springframework.boot.SpringApplication;
import org.springframework.boot.autoconfigure.SpringBootApplication;

@SpringBootApplication
public class SpringBootRestfulApiHibernatePostgresqlApplication {

	public static void main(String[] args) {
		SpringApplication.run(SpringBootRestfulApiHibernatePostgresqlApplication.class, args);
	}

}
In the above Controller class code, we are performing the following operations.
- Reading or Fetching all the employee details from the database.
- Fetching particular employee details based on the employee Id.
- Creating a new Employee.
- Updating the existing employee details.
- Deleting the existing employee from the database table.
So, in short, we are performing CRUD Operations that is Create, Read, Update, and Delete.
Note: Final folder structure will look like as shown below.
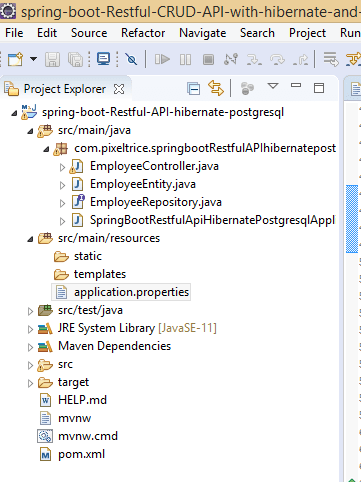
Step 14: Run the application and perform all the above-mentioned CRUD Operation one by one from POSTMAN.
Step 15: Create a new employee from POSTMAN.
Open the POSTMAN, go to the body section and select raw, then write the following parameter and hit following URL http://localhost:8080/api/employee/create-employees
{
    "employeeId":34,
    "name":"John",
    "location":"USA",
    "emailId":"abcbhghg@gmail.com"
}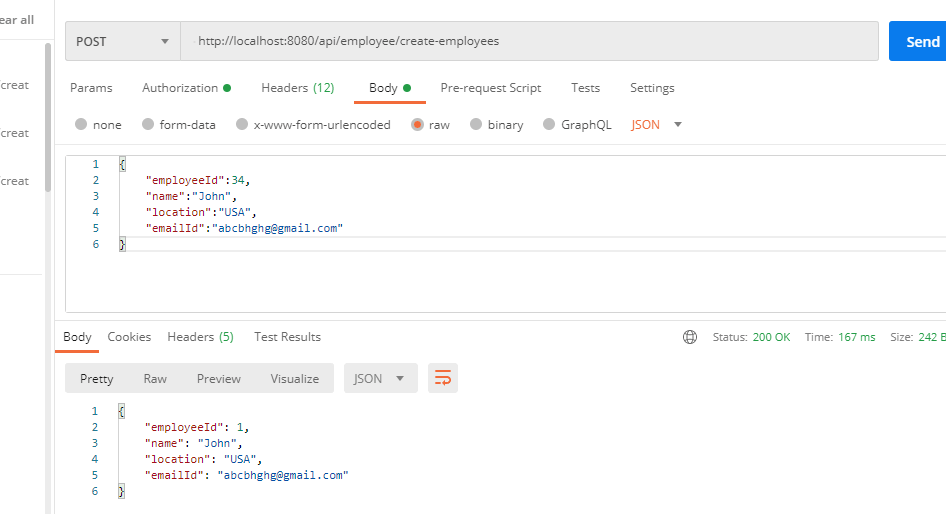
Note: Make sure that Content-Type should be application/json in the Header section of POSTMAN.
Step 16: Go to table employee in a database present in PgAdmin tool and verify that new employee has been created.
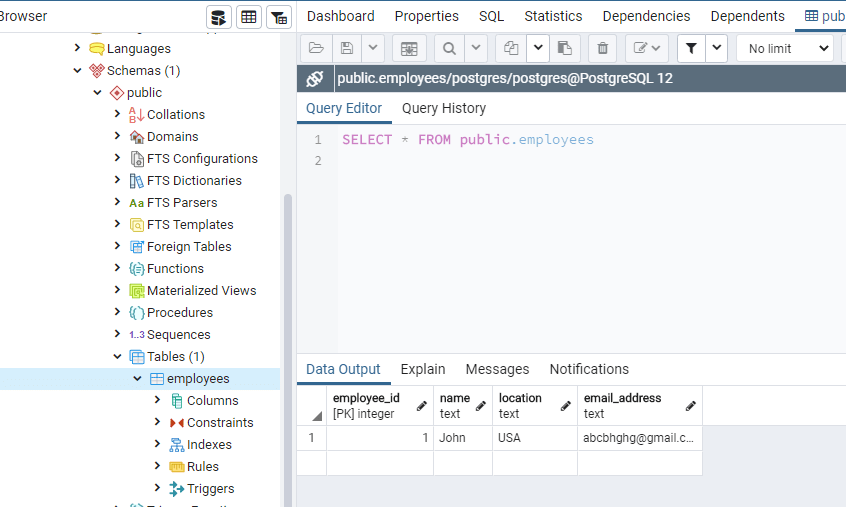
Note: You might see employee id value is different, this is because while creating table only we make data type is serial for employee Id, that means id will auto-generated.
Step 17: Get the list of employee present in the table.
Add two more employee detail in the database. So, we can fetch a list of employees. Once you follow stored two more employee details, then hit or call the following URL to get a list of employees in response. Request Method should be GET. http://localhost:8080/api/employee/get-all-employees
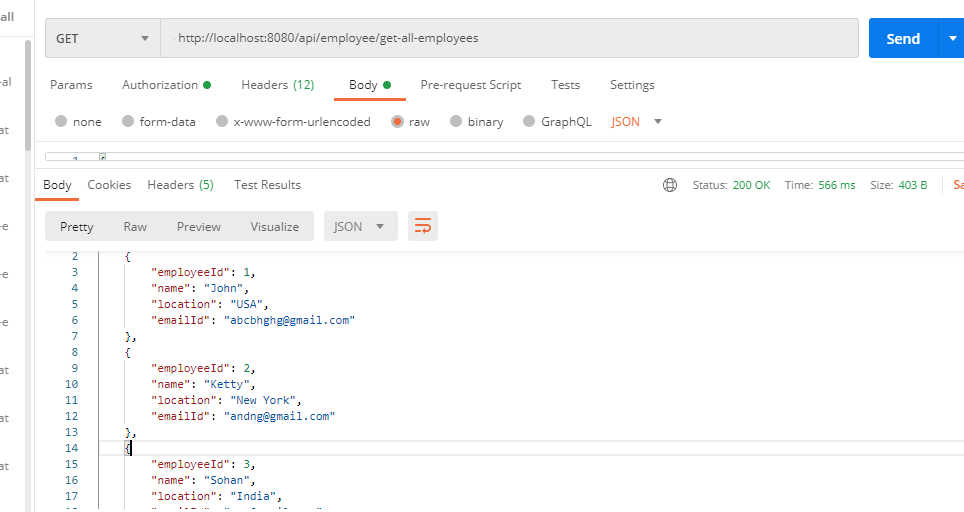
Step 18: Get the employee detail based on employee Id.
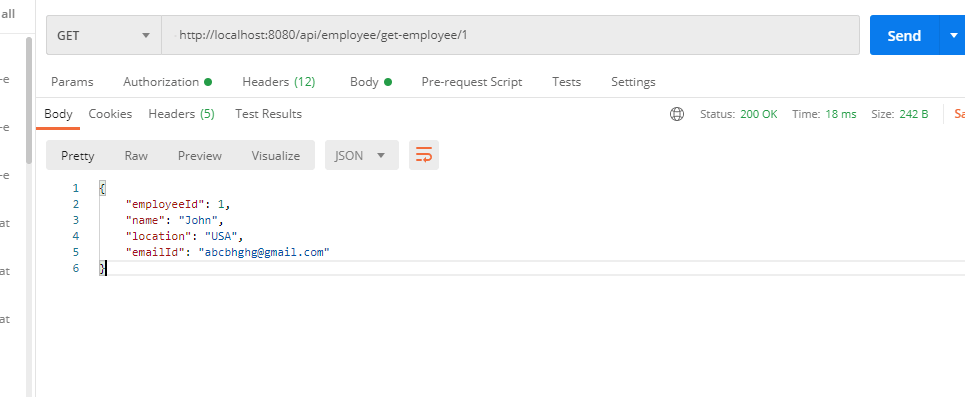
Since we already know one employee detail is already present inside the table whose id is 1. So call the following URL with GET Request from POSTMAN http://localhost:8080/api/employee/get-employee/1
You will get the response as shown below.
Step 19: Update the existing employee based on employee Id.
Step 20: Delete the existing employee based on emplyee Id.
Summary
Thank You so much for reading my article. In this article, we learned to Build Spring Boot Restful CRUD API with Hibernate and Postgresql from scratch. If you have any queries or doubts please feel free to ask me anytime. I will love to solve your queries as soon as possible.
You can also check out my other Spring Boot articles.
- Spring Boot Security using OAuth2 with JWT
- Deploy the Spring Boot Application on External Tomcat Server
- How to send email using Spring Boot Application
- How to add an Interceptor in a Spring Boot Application
- Run Application from Spring Boot CLI
- How to develop Spring Boot Web Application using Thymeleaf