In this article, we will learn about runners in Spring Boot. There are two types of runner interface present in Spring Boot that is ApplicationRunner and CommandLineRunner.
Uses of Runner in Spring Boot Application
It helps us to execute or run some code just after the spring boot started. With the help of these interfaces, we can perform any operations immediately after the application starts running.
ApplicationRunner Interface
It is used to perform any task or actions immediately after the spring boot application started. Basically this interface contains a method named run() which only gets executed once the application started.
So once any class implements this method we need to override and add our own business logic or the actions which we want to perform. In the below example, I have implemented the ApplicationRunner interface in the main class.
package com.pixeltrice.springbootrunner;

import org.springframework.boot.ApplicationArguments;
import org.springframework.boot.ApplicationRunner;
import org.springframework.boot.SpringApplication;
import org.springframework.boot.autoconfigure.SpringBootApplication;

@SpringBootApplication
public class SpringBootRunnerApplication implements ApplicationRunner {

	public static void main(String[] args) {
		SpringApplication.run(SpringBootRunnerApplication.class, args);
	}


	@Override
	public void run(ApplicationArguments args) throws Exception {
		System.out.println("This will run just after application started");

	}

}
In the above code, the logic or statement written inside the run() will get executed just after the application gets started.
CommandLine Runner Interface
It also works in the same way as ApplicationRunner Interface. It also used to run the code just immediately after the spring boot application started. Below is the sample code to implement this interface in the main class.
package com.pixeltrice.springbootrunner;


import org.springframework.boot.CommandLineRunner;
import org.springframework.boot.SpringApplication;
import org.springframework.boot.autoconfigure.SpringBootApplication;

@SpringBootApplication
public class SpringBootRunnerApplication implements CommandLineRunner {

	public static void main(String[] args) {
		SpringApplication.run(SpringBootRunnerApplication.class, args);
	}

	@Override
	public void run(String... args) throws Exception {
		System.out.println("This will run just after application started");

	}

}
So, in the above code, we have a run() method which will get executed immediately after the application started and perform the necessary actions written inside that run method block.
I hope you understand the basics of these two interfaces but still you might wonder what exactly we write inside the run() or what is the exact code which has to be executed immediately after the application started.
So , don’t worry I will give you real time example.
In real projects or applications, some of the data are not going to change in entire projects such as Timezones or some statics value. So what we do in a real project, we create a separate table in the database and stored all static values inside that table.
And inside the run() we write a query to fetch all static data from the database table. So when the application started the very first thing happens is that query gets executed and all the static data gets loaded in the spring boot project. So in the further line of code, we can use it anytime whenever required in our project.
Let us develop a Spring Boot Application that implements the ApplicationRunner Interface.
Step 1: Create a maven project from Spring Intializr.
Step 2: Add the group name as your choice. I am using com.pixeltrice.
Step 3: Give the artifact name spring-boot-runner.
Step 4: Choose Spring Web dependency.
Step 5: Click on generate button. You will the project in zip file.
Step 6: Unzipped the file and import the project inside the IDE such as Eclipse.
Select File -> Import -> Existing Maven Projects -> Browse -> Select the folder spring-boot-runner-> Finish.
Step 7: Go to the main class or the class which tagged with @SpringBootApplication annotation and having a main() method.
Step 8: Implement the ApplicationRunner interface with this class as shown in the below code, and override the run() method.
package com.pixeltrice.springbootrunner;

import org.springframework.boot.ApplicationArguments;
import org.springframework.boot.ApplicationRunner;
import org.springframework.boot.SpringApplication;
import org.springframework.boot.autoconfigure.SpringBootApplication;

@SpringBootApplication
public class SpringBootRunnerApplication implements ApplicationRunner {

	public static void main(String[] args) {
		SpringApplication.run(SpringBootRunnerApplication.class, args);
	}

	@Override
	public void run(ApplicationArguments args) throws Exception {
		System.out.println("This will run just after application started");

	}

}
Step 9: Create a Controller class as shown below.
package com.pixeltrice.springbootrunner;

import org.springframework.web.bind.annotation.GetMapping;
import org.springframework.web.bind.annotation.RestController;

@RestController
public class RunnerController {

	@GetMapping("/home")
	void get(){
		System.out.println("Welcome to Runner Controller");
	}

}
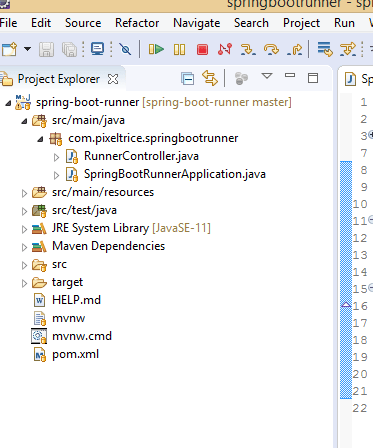
Final Structure of Folders in Eclipse Workspace.

Step 10: Run the Spring Boot Application. You will get the output in Spring boot when you hit the following URL from browser localhost:8080/home.
This will run just after application started
2020-08-10 10:05:49.377  INFO 9040 --- [nio-8080-exec-1] o.a.c.c.C.[Tomcat].[localhost].[/]       : Initializing Spring DispatcherServlet 'dispatcherServlet'
2020-08-10 10:05:49.377  INFO 9040 --- [nio-8080-exec-1] o.s.web.servlet.DispatcherServlet        : Initializing Servlet 'dispatcherServlet'
2020-08-10 10:05:49.388  INFO 9040 --- [nio-8080-exec-1] o.s.web.servlet.DispatcherServlet        : Completed initialization in 11 ms
Welcome to Runner Controller

Have you noticed the first line and last line? You can see the first line is actually written inside the main class in the run() that gets executed first. Actually even if you did not hit the URL localhost:8080/home, you will still see the first line in your console because it completed executed by the spring boot application itself.
Summary
In this article, we learned about the Application Runner and Command-Line Run along with their uses. If you have any queries or doubts please feel free to ask, I will love to clear your doubts as soon as possible.
Your reference, I have given the source code. Please clone it and use, if you are facing any difficulties or otherwise you can do comment below for any assistance. Thank You.
You can also check out my other Spring Boot articles.
- Spring Boot Security using OAuth2 with JWT
- Deploy the Spring Boot Application on External Tomcat Server
- How to send email using Spring Boot Application
- How to add an Interceptor in a Spring Boot Application
- Run Application from Spring Boot CLI