In this article, we will build a simple employee registration form using Servlet, JSP, JDBC, and MySQL.
Please follow the below steps to build from sctrach.
Note: I am using Eclipse in this project. Source Code is available in the bottom section.
Video Tutorial is available in bottom section of this article.
Step 1: Create an Dynamic Web Project in your IDE.
- If you are using Eclipse or any other IDE, please create the Dynamic Web Project. File –> New –> Project. Once you click on Project a Wizard Window will appear on your screen, select Dynamic Web Project Under the Web Folder as shown in the figure.
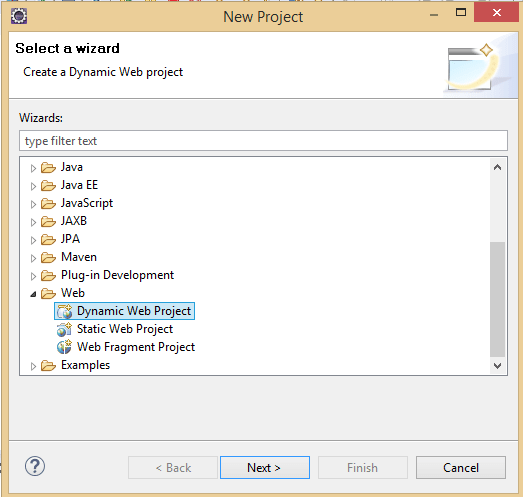
- Click on the Next Button.
- Fill the Project Name Field. jsp-servlet-jdbc-mysql-app.
- Click on Finish.
Step 2: Configure the Tomcat Server in Eclipse.
- If you don’t have Tomcat on your system, then please download it from the official site. https://tomcat.apache.org/download-80.cgi.
- Once you have downloaded and extracted, please come back to Eclipse Workspace. In the bottom section, you can see the different tabs are available. Please select the Servers as shown in the figure.

- Click on the link as you see in blue.
- Select the Apache and choose the latest server version.
- Once you click on the Next button, you will see the screen as shown below.
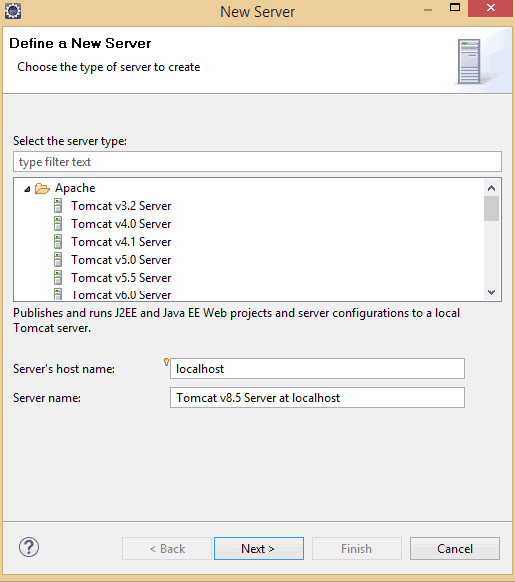
- Click on the browse button and choose the folder where you have extracted the tomcat server file after downloading it.
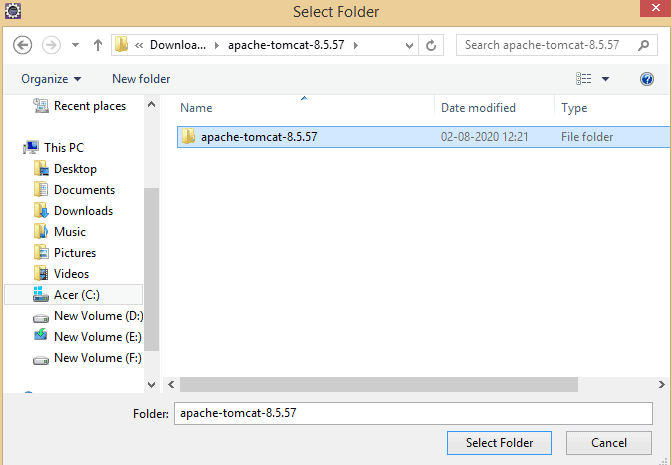
- Select the project and click on finished.
Step 3: Add the following dependencies.
Please download and add the latest version following jar files inside the lib folder.
- jsp-api-5.5.23.jar
- javax.servlet-api-3.0.1.jar
- mysql-connector-java-5.1.23-bin.jar
- jstl.jar
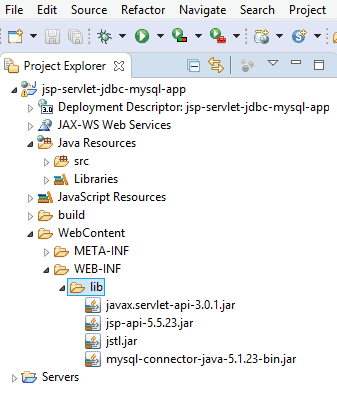
Note: Please make sure you should download the servlet jar file version 3.0.0 or greater. Since we are going to use the annotation-based configuration such as @WebServlet.
Step 4: MySQL Database SetUp
I am assuming that MySQL Workbench has been installed on your system. If not please download and install.
Create a Database or Schema with name registrationApp and under that create a table with the named employee with the help of following SQL Query.
CREATE TABLE registrationapp.employee (
   `id` int(3) NOT NULL AUTO_INCREMENT,
   `first_name` varchar(20) ,
   `last_name` varchar(20) ,
   `username` varchar(250) ,
   `password` varchar(20) ,
   `address` varchar(45) ,
   `contact` varchar(45),
    PRIMARY KEY (`id`)
)
Step 5: Create a JavaBean Class for the Employee.
Employee.java
import java.io.Serializable;

/**
 * JavaBean class used in jsp action tags.
 * @author Shubham Kumar
 */
public class Employee implements Serializable {

    private static final long serialVersionUID = 1L;
    private String firstName;
    private String lastName;
    private String username;
    private String password;
    private String address;
    private String contact;
    public String getFirstName() {
        return firstName;
    }
    public void setFirstName(String firstName) {
        this.firstName = firstName;
    }
    public String getLastName() {
        return lastName;
    }
    public void setLastName(String lastName) {
        this.lastName = lastName;
    }
    public String getUsername() {
        return username;
    }
    public void setUsername(String username) {
        this.username = username;
    }
    public String getPassword() {
        return password;
    }
    public void setPassword(String password) {
        this.password = password;
    }
    public String getAddress() {
        return address;
    }
    public void setAddress(String address) {
        this.address = address;
    }
    public String getContact() {
        return contact;
    }
    public void setContact(String contact) {
        this.contact = contact;
    }
}
Step 6: Create a DAO Class for the Employee.
This class contains all the JDBC Code to connect with MySQL Database along with the queries to insert the employee details in the database table.
EmployeeDAO.java
import java.sql.Connection;
import java.sql.DriverManager;
import java.sql.PreparedStatement;
import java.sql.SQLException;

public class EmployeeDAO {

    public int registerEmployee(Employee employee) throws ClassNotFoundException {
        String INSERT_USERS_SQL = "INSERT INTO employee" +
            "  (first_name, last_name, username, password, address, contact) VALUES " +
            " (?, ?, ?, ?,?,?);";

        int result = 0;

        Class.forName("com.mysql.jdbc.Driver");

        //Step 1: Established the connection with database
      try (Connection connection = DriverManager
     .getConnection("jdbc:mysql://localhost:3306/registrationapp? useSSL=false", "root", "MYSQL PASSWORD");

        // Step 2:Create a statement using connection object
            PreparedStatement preparedStatement =  connection.prepareStatement(INSERT_USERS_SQL)) {                preparedStatement.setString(1,employee.getFirstName());
            preparedStatement.setString(2,employee.getLastName());
            preparedStatement.setString(3,employee.getUsername());
            preparedStatement.setString(4,employee.getPassword());
            preparedStatement.setString(5, employee.getAddress());
            preparedStatement.setString(6, employee.getContact());

        // Step 3: Execute the query or update query
            result = preparedStatement.executeUpdate();

        } catch (SQLException e) {
            // process sql exception
            printSQLException(e);
        }
        return result;
    }

    private void printSQLException(SQLException ex) {
        for (Throwable e: ex) {
            if (e instanceof SQLException) {
                e.printStackTrace(System.err);
                System.err.println("SQLState: " + ((SQLException) e).getSQLState());
                System.err.println("Error Code: " + ((SQLException) e).getErrorCode());
                System.err.println("Message: " + e.getMessage());
                Throwable t = ex.getCause();
                while (t != null) {
                    System.out.println("Cause: " + t);
                    t = t.getCause();
                }
            }
        }
    }
}
All the steps performed in the above code are self-explanatory, You can easily understand each line of code.
Step 7: Create a Servlet for the Employee.
In this step, we will create a Servlet class to accept and process the HTTP Request comes from the client-side and redirect the necessary information or parameters to the appropriate JSP page after storing it into the database.
EmployeeServlet.java
import java.io.IOException;

import javax.servlet.RequestDispatcher;
import javax.servlet.ServletException;
import javax.servlet.annotation.WebServlet;
import javax.servlet.http.HttpServlet;
import javax.servlet.http.HttpServletRequest;
import javax.servlet.http.HttpServletResponse;

@WebServlet("/register")
public class EmployeeServlet extends HttpServlet {
    private static final long serialVersionUID = 1L;
    private EmployeeDAO employeeDAO;

    public void init() {
    	employeeDAO = new EmployeeDAO();
    }

    protected void doPost(HttpServletRequest request, HttpServletResponse response)
    throws ServletException, IOException {

    	int registerEmployeeId = 0;

        String firstName = request.getParameter("firstName");
        String lastName = request.getParameter("lastName");
        String username = request.getParameter("username");
        String password = request.getParameter("password");
        String address = request.getParameter("address");
        String contact = request.getParameter("contact");

        Employee employee = new Employee();
        employee.setFirstName(firstName);
        employee.setLastName(lastName);
        employee.setUsername(username);
        employee.setPassword(password);
        employee.setContact(contact);
        employee.setAddress(address);

        try {
        	registerEmployeeId = employeeDAO.registerEmployee(employee);
        } catch (Exception e) {
            e.printStackTrace();
        }
        if(registerEmployeeId > 0) {
        request.setAttribute("firstName",employee.getFirstName());
          request.setAttribute("lastName",employee.getLastName());
          request.setAttribute("username",employee.getUsername());
          request.setAttribute("contact", employee.getContact());
          request.setAttribute("address", employee.getAddress());

          RequestDispatcher requestDispatcher = request.getRequestDispatcher("employeeDetails.jsp");
          requestDispatcher.forward(request, response);
        }
    }
}
Step 8: Create a JSP for the Employee Registration Page.
Let us create design an HTML page where the employee can enter their details and register themself.
employeeRegister.jsp
<%@ page language="java" contentType="text/html; charset=ISO-8859-1"
    pageEncoding="ISO-8859-1"%>
<!DOCTYPE html>
<html>
<head>
<meta charset="ISO-8859-1">
<title>Insert title here</title>
</head>
<body>
 <div align="center">
  <h1>Employee Register Form</h1>
  <form action="<%= request.getContextPath() %>/register" method="post">
   <table style="with: 80%">
    <tr>
     <td>First Name</td>
     <td><input type="text" name="firstName" /></td>
    </tr>
    <tr>
     <td>Last Name</td>
     <td><input type="text" name="lastName" /></td>
    </tr>
    <tr>
     <td>UserName</td>
     <td><input type="text" name="username" /></td>
    </tr>
    <tr>
     <td>Password</td>
     <td><input type="password" name="password" /></td>
    </tr>
    <tr>
     <td>Address</td>
     <td><input type="text" name="address" /></td>
    </tr>
    <tr>
     <td>Contact No</td>
     <td><input type="text" name="contact" /></td>
    </tr>
   </table>
   <input type="submit" value="Submit" />
  </form>
 </div>
</body>
</html>
Explanation:
<form action="<%= request.getContextPath() %>/register" method="post">When you submit the form then /register of EmployeeServlet class gets called and it will accept all the data to process and store it into the database and at last, it will redirect to another JSP page named “employeeDetails.jsp”.
request.getContextPath(): It will return the root path of the project.
employeeDetails.jsp
<%@ page language="java" contentType="text/html; charset=ISO-8859-1"
    pageEncoding="ISO-8859-1"%>
<!DOCTYPE html>
<html>
<head>
<meta charset="ISO-8859-1">
<title>Insert title here</title>
</head>
<body>
 <h1 style="text-align: center">Employee has been Successfully Registered!</h1>
 <%
String employeeFirstName = request.getAttribute("firstName").toString();
String employeeLastName = request.getAttribute("lastName").toString();
String employeeUsername = request.getAttribute("username").toString();
String employeeContact = request.getAttribute("contact").toString();
String employeeAddress = request.getAttribute("address").toString();

 out.println("<h2>Please verify the details</h2>");
 %>
 <table border="1" style="width: 80%; margin-left: auto; margin-right: auto; ">
    <tr>
     <td><b>First Name</b></td>
     <td><%= employeeFirstName %></td>
    </tr>
    <tr>
     <td><b>Last Name</b></td>
     <td><%= employeeLastName %></td>
    </tr>
    <tr>
     <td><b>UserName</b></td>
     <td><%= employeeUsername %></td>
    </tr>
    <tr>
     <td><b>Address</b></td>
     <td><%= employeeAddress %></td>
    </tr>
    <tr>
     <td><b>Contact No</b></td>
     <td><%= employeeContact %></td>
    </tr>
   </table>
</body>
</html>
Different type of Scripting Elements used in JSP
As you can see in the above code we are using some different symbols .To write the java code along with the HTML tags in the JSP (Java Server Page), we have to use the following scripting elements.
| Scripting Element | Example |
| Directive | <%@ directive %> |
| Declaration | <%! declarations %> |
| Scriptlet | <% scriplets %> |
| Expression | <%= expression %> |
| Comment | <%– comment –%> |
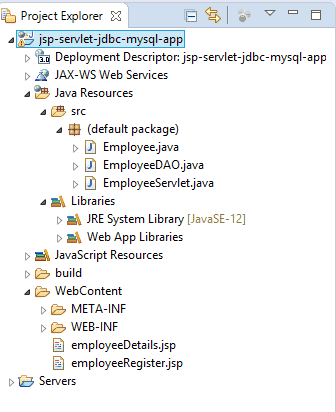
Now we are good to go and run our application the server.
Final Project Structure
Step 9: Run the Application on Server.
Right Click on the project name and choose Run on Server, or you can also Run from the server tab at the bottom of the Eclipse workspace.
Once the Application starts running on the server, just search the following URL. http://localhost:8080/jsp-servlet-jdbc-mysql-app/employeeRegister.jsp

Summary
In this article, we have learned to build a simple registration form using the JSP, Servlet, JDBC, and MySQL. If you faced any issue or have some doubts please feel free to ask in the comment section.
You might also like this article.
- Spring Security LDAP Authentication Example using Spring Boot Application
- Payment Integration With Paytm in Spring Boot Application
- Send OTP(One Time Password) Using Spring Boot Application for Authentication
- Make a Voice Call from Spring Boot Application to Mobile Phone
- How to send email using Spring Boot Application
- Spring Boot Security using OAuth2 with JWT