In this article, we will learn how to deploy the Spring Boot Application on External Tomcat Server. If you are familiar with Spring boot then you already know spring boot has embedded Tomcat Server to run the application, which we generally use to run our application while coding or learning.
But when comes to deployment on the production server or some other external server then we cannot use the embedded tomcat server.
Note: If you want to learn from video please refer to bottom of this page.
Some Reasons for not using Embedded Tomcat Server for Real-Time Projects
- Security Issue
- Maintenance
- The monitoring of Application is difficult.
Things need to be done for deploying the Spring Boot Application on External Tomcat Server
- Packaging the application as a war file.
- Prevent the Spring Boot from using the embedded Tomcat Server.
Packaging the application as a war file
If we want to run the application on an embedded tomcat server then we either run by Using Eclipse or any other IDE feature, or we create a jar file and run spring boot application through Command-Line.
If you want to learn how to run the spring boot application through the command line then please follow this article Create a web application with Spring Boot.
Creating a war file of Spring Boot Application
Code for the Spring Boot Application when you want to deploy on the embedded tomcat server as a jar file.
package com.pixelTrice.firstSpringBootApplication;

import org.springframework.boot.SpringApplication;
import org.springframework.boot.autoconfigure.SpringBootApplication;

@SpringBootApplication
public class FirstSpringBootApplication {

	public static void main(String[] args) {
		SpringApplication.run(FirstSpringBootApplication.class, args);
	}

}
But when we want to deploy on an external tomcat server then you need to add some additional code. We have to extend the class SpringBootServletInitializer and override the method configure(SpringApplicationBuilder application).
The method configure (SpringApplicationBuilder application) is present in the class SpringBootServletInitializer, since we extend the class so we need to override in order to support war file deployment.
The code will be look like as shown below.
package com.pixelTrice.firstSpringBootApplication;

import org.springframework.boot.SpringApplication;
import org.springframework.boot.autoconfigure.SpringBootApplication;
import org.springframework.boot.builder.SpringApplicationBuilder;
import org.springframework.boot.web.servlet.support.SpringBootServletInitializer;

@SpringBootApplication
public class FirstSpringBootApplication extends SpringBootServletInitializer {

	public static void main(String[] args) {
		SpringApplication.run(FirstSpringBootApplication.class, args);
	}
      @Override
   protected SpringApplicationBuilder configure(SpringApplicationBuilder
   application) {
      return application.sources(FirstSpringBootApplication.class);
   }

}
When the war file run we need to direct them to start from the class where @SpringBootApplication annotation and main() method is present, so in order to do that we need to add the following tag inside the properties tag in pom.xml file.
<properties>
   <java.version>11</java.version>
   <start-class>
        com.pixelTrice.firstSpringBootApplication.FirstSpringBootApplication
   </start-class>
</properties>
One more change we need to do, In pox.xml file we have to add or update the <packaging>jar</packaging> to <packaging>war</packaging>.
So the top section of pom.xml will look like as shown below.
 <groupId>com.pixeltrice</groupId>
	<artifactId>firstSpringBootApplication</artifactId>
	<version>0.0.1-SNAPSHOT</version>
	<packaging>war</packaging>
	<name>firstSpringBootApplication</name>
	<description>Demo project for Spring Boot</description>
Have you noticed <packaging>war</packaging>.
Preventing the Spring Boot from using the embedded Tomcat Server
For this purpose we need to add or modify if it is already present as shown below.
 <dependency>
            <groupId>org.springframework.boot</groupId>
            <artifactId>spring-boot-starter-tomcat</artifactId>
            <scope>provided</scope>
  </dependency>
Create a Simple Rest Controller class to display something on the browser when the Spring Boot war file gets executed. But hold down, check inside the pom.xml the following dependency is available or not. If not please add it.
<dependency>
   <groupId>org.springframework.boot</groupId>
   <artifactId>spring-boot-starter-web</artifactId>
</dependency>
Rest Controller class
package com.pixelTrice.firstSpringBootApplication;
import org.springframework.web.bind.annotation.RestController;
import org.springframework.web.bind.annotation.RequestMapping;

@RestController
public class HelloWorldController {

	@RequestMapping("/home")
	public String index() {
		return "Greetings from Spring Boot!";
	}

}
Now, let’s begin to package the application as a war file.
There are two ways of doing packaging.
- Using command prompt.
- Using IDE such as Eclipse.
Packaging war file using command prompt
Note: Here I taking the example of Maven.
Step 1: Go inside the project folder, for my case I saved it in following path C:\Users\1302143\Desktop\firstSpringBootApplication
Step 2: Open the command prompt inside that folder or you can skip Step 1, and directly come into the project path inside the command prompt as shown below.

Step 3: Type the command mvn package.

Step 4: Press Enter. You will see following message on command prompt.
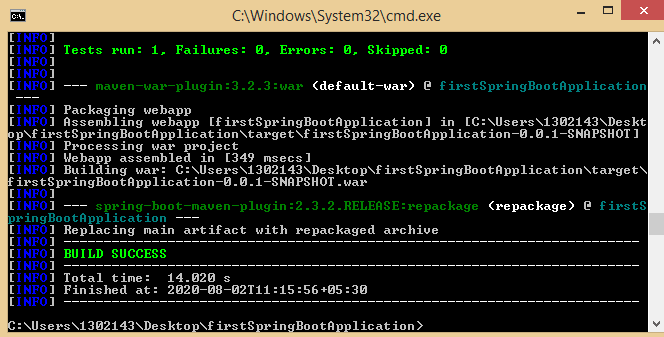
Boom! You have created the war file for your spring boot application. In order to check go inside the target folder C:\Users\1302143\Desktop\firstSpringBootApplication\target. You will see the war file with the name firstSpringBootApplication-0.0.1-SNAPSHOT.war
Packaging war file using IDE such as Eclipse
Right Click on project name –> Run As –> Maven install
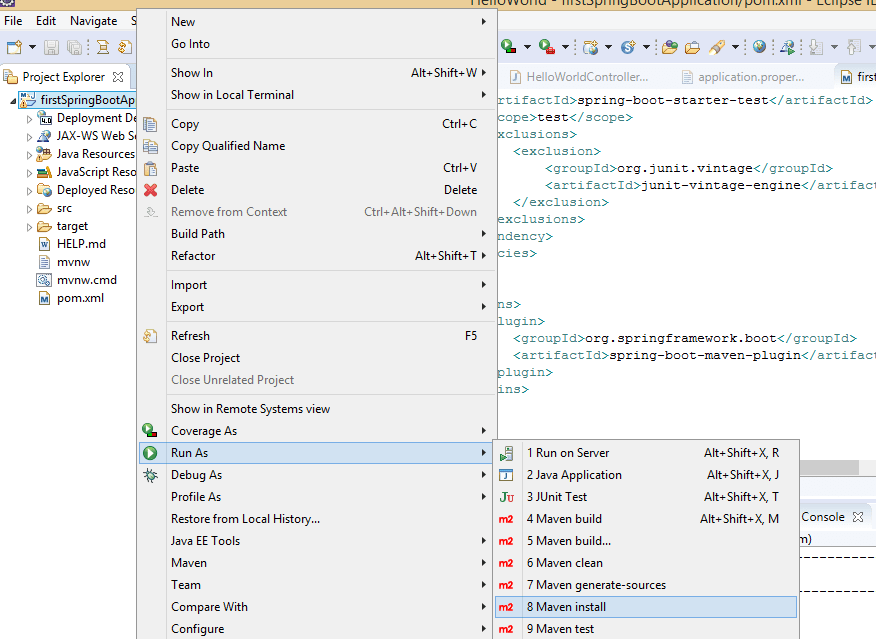
Note: If you follow above steps you will see the war file inside the target folder.
Deploying Spring Boot war file on External Tomcat
You must have an apache tomcat installed on your computer. If not please download and install it. Once you installed and then go inside the folder of apache tomcat, for my case the path of tomcat is C:\Users\1302143\Downloads\apache-tomcat-8.5.57\apache-tomcat-8.5.57 you will see webapps folder. Just Copy your war file from C:\Users\1302143\Desktop\firstSpringBootApplication\target and paste it inside the webapps folder.
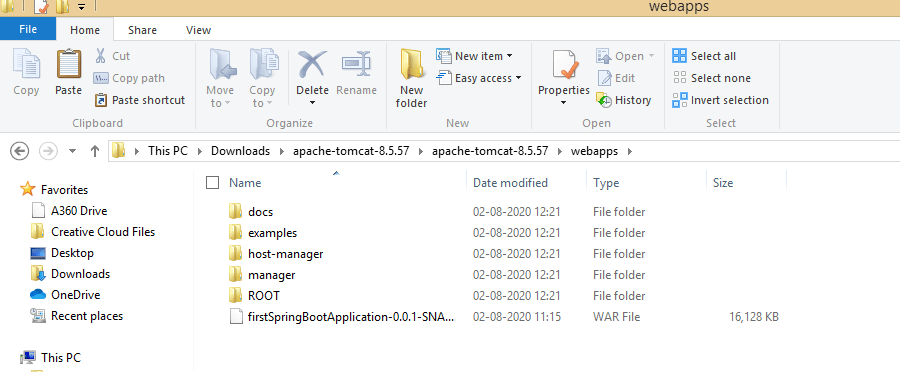
Run the External Tomcat Server
Step 1: Open the command prompt inside the tomcat bin folder in following path C:\Users\1302143\Downloads\apache-tomcat-8.5.57\apache-tomcat-8.5.57\bin or you simply open command prompt and reached to the path as I mentioned.

Step 2: Type the command startup.sh and press enter.
Boom! The external Tomcat server starts running. You can verify on your browser with URL localhost:8080. You will see the screen as shown below.
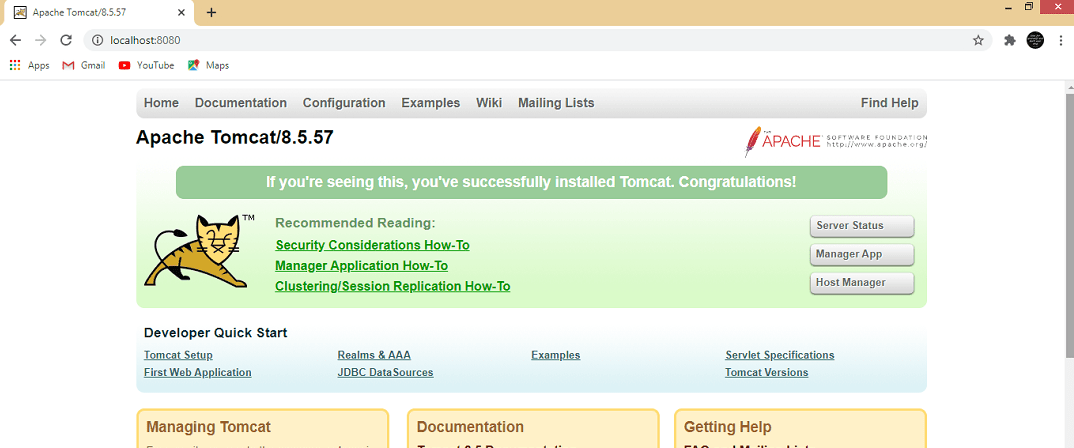
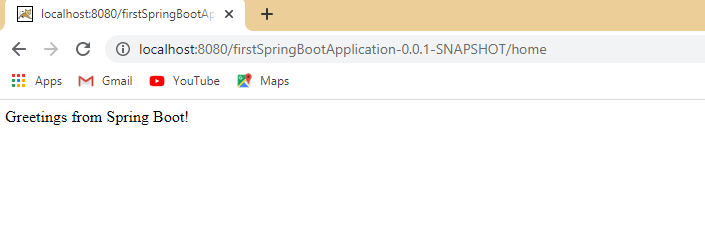
Now Navigate to the following URL in order to verify the Rest API is working on http://localhost:8080/firstSpringBootApplication-0.0.1-SNAPSHOT/home. You will see the screen as shown below.
Step 4: To stop tomcat server type command shutdown.sh inside bin folder.
Note: You can download complete source code from my github.
Summary
In this article, we learned how to Deploy the Spring Boot Application on External Tomcat Server. I hope you understand everything, but still, if you have any queries or suggestions please free to ask me in the comment section. I would love to solve your doubts.