This article will provide you all the steps required to Build the first Application with Spring Boot from A to Z. I am assuming that you have zero ideas or you are completely new to Spring boot. Even you don’t know the basic Spring framework too, then no need to worry about that. I assure you that I will not disappoint you.
Small Overview of the things you are going to learn from this article.
- How to build a Spring boot web application from scratch.
- Advantages of Spring Boot.
- Important Annotations required for developing a spring boot application.
- To run the spring boot application using command lines.
- Learn to write basic unit test cases for Spring boot application.
- How to check the health of Spring boot Application.
- What is the Actuator.
Step 1: Adding Spring Initializr
When we start developing any application, the biggest problem every developer faced is how to structure properly the whole project files and folders, and adding the necessary dependencies required for the application.
Spring boot team provides us the basic inbuild structure or framework which really reduces the extra effort required on adding necessary jar files manually in the classpath or creating the necessary folders inside the code editor tools(for example in eclipse editor) and even you don’t have to add dependency code with yourself. This all thing you will get in Spring Initializr.
What is Spring Initializr?
In a simple word, Spring Initializr is a tool that provides you all the necessary resources at a single place to develop the spring boot application.
You can consider Spring Initializr as a waiter at some restaurants, Suppose you visited a restaurant to eat different varieties of dishes. So what you will do, definitely you have to tell the waiter so that he or she will list down the things that you want to eat. And after a few moments, they will serve all the demanded dishes on your table.
So here you don’t have to go by yourself and bring one by one all dishes on the table. Here the waiter is providing all thing right on your table.
If I relate with Spring boot, A Spring Initializr is acting as a waiter, which provides you all the necessary resources whatever you demand. And there in the restaurant, you have to pay some amount, but in Spring Initializr you are getting all for free ( like free meals).
What are the things Spring Initializr provides?
- You have the option to select Maven or Gradle Project.
- Spring boot version on which your application should be developed.
- Also, it provides the flexibility to choose the jdk version for java.
- You can choose as many dependencies which are necessary for your project. Here I am choosing the spring web dependency.
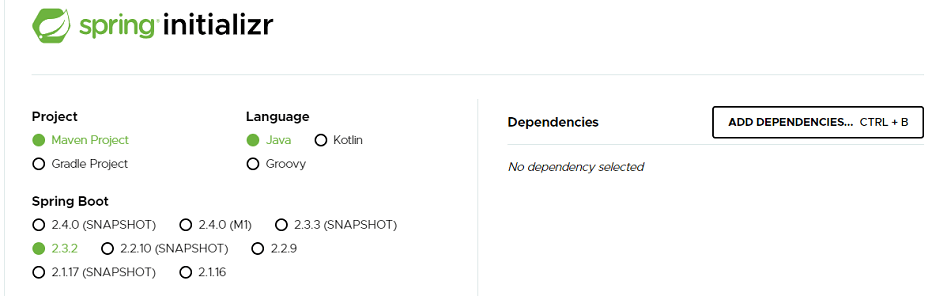
Note: All mentioned points you can select in a single screen as shown below. Once you have ready then click on the Generate button. The complete files will download in the format of zip. Example: demo.zip. Click on Spring Initializr to reached on the below screen.

In the above image, you can see there are few aliens fields such as Group, artifact, name, etc under the Project Metadata section. I briefly explain these terms.
- Group: In this field, you have written the name of your company or group or organization in which you are working. If you are a student then just give your dream company name or if you have a dream of building your own business or company then today is the day to think about a better name for your startup.
Format of assigning the group name.
com.companyName, For me Group will be com.pixeltrice.
- Artifact: Name of the project. Example: firstSpringBootApp.
- Name: Same as Artifact, the name of the project.
- Description: About your project.
- Packaging name: Name of the folder in which you will keep or create all java files.
Format of assigning the package name
com.companyName.projectName , For me com.pixeltrice.firstSpringBootApp
Once you click on Generate button downloading of .zip folder will start on bottom left corner of your screen. After the completion of download , just right click on that folder and select Extract All.
After the extraction, you will get the folder name with the project name, for me name will be firstSpringBootApp. That folder contains all the necessary dependencies and jar files you have selected in the Spring Initalizr.
Note : Import the file in your favourte code editor, Here I’m using eclipse.
Steps To import the Spring Initializr in your Code Editor or Eclipse Tool.
- Open the Eclipse.
- Click on the File at the top left corner of your screen.
- Choose import.
- Under import dialog box select Maven.
- Inside the maven, you will get at the second option to choose the Existing Maven project.
- Click on next.
- Choose the directory or folder where your downloaded unzip files have been stored.
- Click on the finish button.
You can see on the left side of your screen your downloaded folder has been imported.
Great Job! You have successfully completed the first step. Now we all ready to start writing real code for developing the application.
To be continued in the next page
Summary
In this article, you have learned about Spring Initalizr, the different terms used in the Spring Initalizr screen, and also learn about how to import that into the code Editor tool like an eclipse. In next article, we will continue our learning to Build the first Application with Spring Boot.
Thank You and Congratulation on the successful completion of your first step. If you have any queries or doubts please feel free to ask, I will solve all your queries as soon as possible.
If you have any suggestions or feedback regarding my articles, please do mention on the comment box. Your suggestions will be acknowledged.
You can also check out my articles on basic Java.